Today I want to share to you all the template that I created so that you can write your thesis smoothly without having headache thinking about Gaya UKM. In this post, I guide you how to use my template and write chapters and sections with it. Lets get start it!
Download Template of UKM Style for Microsoft Word
1. Download the template for Microsoft Word 2007 and above here:
| Template in English |
2. Open the template in Microsoft Word (not in browser)
When you open, don't be surprise nothing is inside. Well, of course nothing, that is your task to write :)
The difference of this file with ordinary Word file is the styles and margins that I created according to UKM style. Check the styles on top right of your Word window. You will see list of styles similar to Figure 1.
 |
| Figure 1. Styles Created for Gaya UKM |
3. Open Navigation Pane
Go to View, make sure Navigation Pane view is checked. Refer to Figure 2, if you are not sure how to do it.
Navigation pane is very useful tool for you to quickly jump to certain chapter, section or sub-section. When navigation pane view is active, a Navigation window appears on the left side.
The reason I asked you to open this window is so that you can clearly notice what is really happening when we go through this tutorial.
 |
| Figure 2. Navigation Pane |
Now, preparation is ready. Lets start to write in UKM style. For the purpose of this tutorial, I use the English version.
Writing Chapter using Template
1. Leave page 1 empty
Later, I want to show you how to generate table of content automatically. So, for now, let it be empty. The fastest way to do this is not pressing Enter many times, but press Enter once and go to Insert, click on Page Break. By this way, it jumps to next page and leaving page 1 to be empty.
2. Create First Chapter
Imagine that page 2 is the first chapter of your thesis. So, go to Home and choose Heading 1 style as shown in Figure 3. Then you will notice that the cursor moves to center page and CHAPTER 1 is added to the navigation pane.
 |
| Figure 3. Heading 1 |
When you click Heading 1 style, it actually writes "Chapter n" text with white color. Why white color? So that it wont be seen but appear in navigation pane. Why we need to use Heading 1 but we never mean to show it? Well, the answer is more complicated. This is because we want to trick Microsoft Word to match with UKM Style of numbering figures or tables. In UKM Style, a figure is numbered with 2 numbers: chapter number combined with figure number, example: Figure 2.1 (which means this figure is the first figure in chapter 2). Microsoft Word can automatically numbers '2' if current Heading 1 is Chapter 2.
Maybe you will ask, then why we don't directly show Heading 1 as 'Chapter I' instead of 'Chapter 1' (UKM Style uses Roman number). We can't do that, because if we show 'Chapter I', the figure number will be something like this: Figure I.2. Microsoft Word cannot convert Roman number to Arithmetic number.
3. Press Enter and Type Chapter Number
You don't need to do anything in Heading 1, just press Enter then you write 'CHAPTER I'. You have to type according to UKM Style (Bold, center and capital letter). I already set that this text appears 5 cm from the top (the same distance with 3 enters with 1.5 line spacing). Basically, I set it so that it is matched with UKM Style. If you want to modify anything, don't use traditional way but instead, you modify the style directly. You can go to Title style, right click and choose modify as shown in Figure 4.
 |
| Figure 4. Title Style - Modifying Chapter Style |
4. Press Enter and Type Title of the Chapter
If you are currently writing chapter I, you might want to write 'INTRODUCTION' or 'LITERATURE REVIEW' for chapter II, and so on. Again, if you want to modify the distance, paragraph, etc, you better modify the style. You can go to Subtitle style, right click and choose modify as shown in Figure 5.
 |
| Figure 5. Subtitle Style - Modifying Title of a Chapter |
5. Press Enter and Type Section of the Chapter
This is the first section of your chapter. Type the title of the section. The numbering is 1.1, 1.2, 1.3 and so on. So, anytime you want to add a section, click Heading 2 style. It will automatically number the subsection wherever your cursor is. Also, check the navigation pane. It shows the section that we just created as shown in Figure 6.
 |
| Figure 6. Heading 2 - Section in a Chapter |
6. Enter and Write the First Paragraph
If you enter once after you type the section title (as we did in previous step), the first paragraph of a section has no tab but the next paragraph has tab. This is stated in UKM Style. The styles are saved in First Paragraph style and the subsequent paragraph uses Normal style. You can modify them if you like.
 |
| Figure 7. First Paragraph and Normal Styles |
7. Enter and Click Heading 2
If you want to add a subsection, you can use Heading 3 style. Don't forget, a subsection must use capital letter on the first letter of a word only. The subsection is added to navigation pane after you create it.
Try to click any items in the navigation pane, the cursor jumps directly to the section. It is cool right? :) This is very useful later on if you have many sections and subsections in your thesis.
 |
| Figure 8. Heading 3 - Subsection of a Chapter |
So, basically that is it how you use my template to write chapters. Pretty easy right? Heading 4 and 5 work the same. You can try on your own. Lets move on to next topic to finish what we skipped in the beginning.
Generate a Table of Content
1. Go to First Page
In the beginning of this tutorial, I asked you to leave page 1 empty. This is the reason. We want to generate table of content automatically based on chapter, sections and subsections that we created using Heading 1, Heading 2 and Heading 3.
For the purpose of this tutorial, I created dummy chapters, sections and subsections, by clicking Heading 1 to 3. You should do that also.
2. Generating Table of Content
Go to References, click Table of Contents, choose custom Table of Content. Refer to Figure 9 if you are not sure how to do it.
3. Customizing Table of Content (TOC)
Choose none in Tab leader and make sure Show levels is 3. Then click OK. Magically it is created for you. For those who have trouble removing the dots in the tab leader, check on the comment where I explained further.
4. Fixing The Format of TOC
Probably, you are not satisfied with the format of TOC. You can modify it easily. For example, move first line indent pointer on the ruler of chapter to the left, then the other chapters will follow.
5. Updating Table of Content
Let say you restructure your thesis, changing section title or modifying page number. You can update the TOC by clicking Update Table on References tab. Then you have option to update the page number only or the whole table.
6. The Limitations of TOC
TOC can only be generated for chapters ONLY. The rest, you have to write manually, such as declaration, abstract, etc. But it is OK, because they are not as complicated as chapters. At least, the biggest trouble has passed.
That is all for this tutorial. I might post another tutorial regarding figure numbering and citing. But it is quite easy. Any questions, just ask.
For the purpose of this tutorial, I created dummy chapters, sections and subsections, by clicking Heading 1 to 3. You should do that also.
2. Generating Table of Content
Go to References, click Table of Contents, choose custom Table of Content. Refer to Figure 9 if you are not sure how to do it.
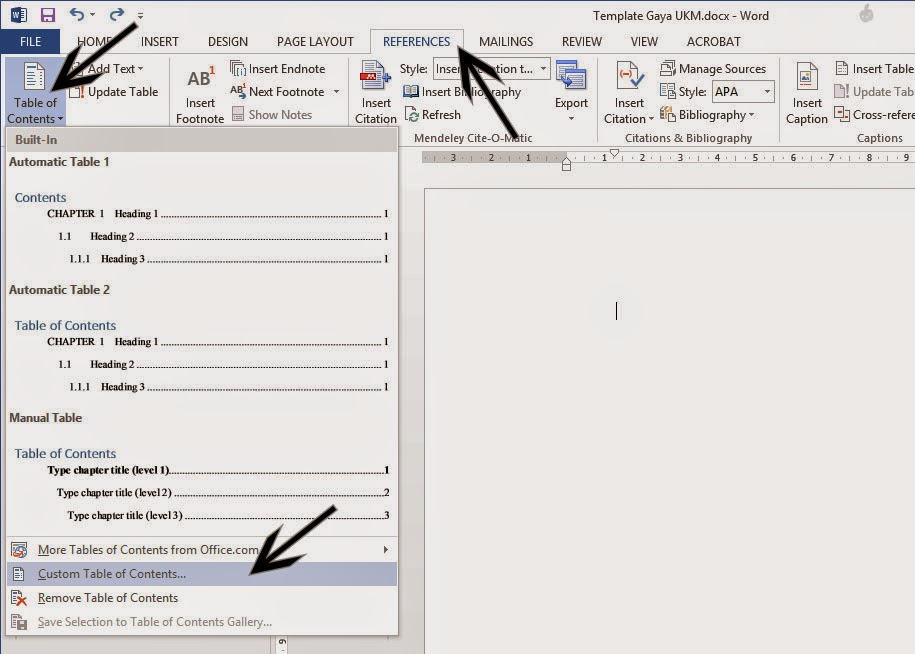 |
| Figure 9. Generate Table of Content |
3. Customizing Table of Content (TOC)
Choose none in Tab leader and make sure Show levels is 3. Then click OK. Magically it is created for you. For those who have trouble removing the dots in the tab leader, check on the comment where I explained further.
 |
| Figure 10. Customizing Table of Content |
4. Fixing The Format of TOC
Probably, you are not satisfied with the format of TOC. You can modify it easily. For example, move first line indent pointer on the ruler of chapter to the left, then the other chapters will follow.
 |
| Figure 11. Fixing Format of TOC |
5. Updating Table of Content
Let say you restructure your thesis, changing section title or modifying page number. You can update the TOC by clicking Update Table on References tab. Then you have option to update the page number only or the whole table.
6. The Limitations of TOC
TOC can only be generated for chapters ONLY. The rest, you have to write manually, such as declaration, abstract, etc. But it is OK, because they are not as complicated as chapters. At least, the biggest trouble has passed.
That is all for this tutorial. I might post another tutorial regarding figure numbering and citing. But it is quite easy. Any questions, just ask.
Work Hard, God will Do the Rest