Today I want to share to you all the template that I created so that you can write your thesis smoothly without having headache thinking about Gaya UKM. In this post, I guide you how to use my template and write chapters and sections with it. Lets get start it!
Download Template of UKM Style for Microsoft Word
1. Download the template for Microsoft Word 2007 and above here:
| Template in English |
2. Open the template in Microsoft Word (not in browser)
When you open, don't be surprise nothing is inside. Well, of course nothing, that is your task to write :)
The difference of this file with ordinary Word file is the styles and margins that I created according to UKM style. Check the styles on top right of your Word window. You will see list of styles similar to Figure 1.
 |
| Figure 1. Styles Created for Gaya UKM |
3. Open Navigation Pane
Go to View, make sure Navigation Pane view is checked. Refer to Figure 2, if you are not sure how to do it.
Navigation pane is very useful tool for you to quickly jump to certain chapter, section or sub-section. When navigation pane view is active, a Navigation window appears on the left side.
The reason I asked you to open this window is so that you can clearly notice what is really happening when we go through this tutorial.
 |
| Figure 2. Navigation Pane |
Now, preparation is ready. Lets start to write in UKM style. For the purpose of this tutorial, I use the English version.
Writing Chapter using Template
1. Leave page 1 empty
Later, I want to show you how to generate table of content automatically. So, for now, let it be empty. The fastest way to do this is not pressing Enter many times, but press Enter once and go to Insert, click on Page Break. By this way, it jumps to next page and leaving page 1 to be empty.
2. Create First Chapter
Imagine that page 2 is the first chapter of your thesis. So, go to Home and choose Heading 1 style as shown in Figure 3. Then you will notice that the cursor moves to center page and CHAPTER 1 is added to the navigation pane.
 |
| Figure 3. Heading 1 |
When you click Heading 1 style, it actually writes "Chapter n" text with white color. Why white color? So that it wont be seen but appear in navigation pane. Why we need to use Heading 1 but we never mean to show it? Well, the answer is more complicated. This is because we want to trick Microsoft Word to match with UKM Style of numbering figures or tables. In UKM Style, a figure is numbered with 2 numbers: chapter number combined with figure number, example: Figure 2.1 (which means this figure is the first figure in chapter 2). Microsoft Word can automatically numbers '2' if current Heading 1 is Chapter 2.
Maybe you will ask, then why we don't directly show Heading 1 as 'Chapter I' instead of 'Chapter 1' (UKM Style uses Roman number). We can't do that, because if we show 'Chapter I', the figure number will be something like this: Figure I.2. Microsoft Word cannot convert Roman number to Arithmetic number.
3. Press Enter and Type Chapter Number
You don't need to do anything in Heading 1, just press Enter then you write 'CHAPTER I'. You have to type according to UKM Style (Bold, center and capital letter). I already set that this text appears 5 cm from the top (the same distance with 3 enters with 1.5 line spacing). Basically, I set it so that it is matched with UKM Style. If you want to modify anything, don't use traditional way but instead, you modify the style directly. You can go to Title style, right click and choose modify as shown in Figure 4.
 |
| Figure 4. Title Style - Modifying Chapter Style |
4. Press Enter and Type Title of the Chapter
If you are currently writing chapter I, you might want to write 'INTRODUCTION' or 'LITERATURE REVIEW' for chapter II, and so on. Again, if you want to modify the distance, paragraph, etc, you better modify the style. You can go to Subtitle style, right click and choose modify as shown in Figure 5.
 |
| Figure 5. Subtitle Style - Modifying Title of a Chapter |
5. Press Enter and Type Section of the Chapter
This is the first section of your chapter. Type the title of the section. The numbering is 1.1, 1.2, 1.3 and so on. So, anytime you want to add a section, click Heading 2 style. It will automatically number the subsection wherever your cursor is. Also, check the navigation pane. It shows the section that we just created as shown in Figure 6.
 |
| Figure 6. Heading 2 - Section in a Chapter |
6. Enter and Write the First Paragraph
If you enter once after you type the section title (as we did in previous step), the first paragraph of a section has no tab but the next paragraph has tab. This is stated in UKM Style. The styles are saved in First Paragraph style and the subsequent paragraph uses Normal style. You can modify them if you like.
 |
| Figure 7. First Paragraph and Normal Styles |
7. Enter and Click Heading 2
If you want to add a subsection, you can use Heading 3 style. Don't forget, a subsection must use capital letter on the first letter of a word only. The subsection is added to navigation pane after you create it.
Try to click any items in the navigation pane, the cursor jumps directly to the section. It is cool right? :) This is very useful later on if you have many sections and subsections in your thesis.
 |
| Figure 8. Heading 3 - Subsection of a Chapter |
So, basically that is it how you use my template to write chapters. Pretty easy right? Heading 4 and 5 work the same. You can try on your own. Lets move on to next topic to finish what we skipped in the beginning.
Generate a Table of Content
1. Go to First Page
In the beginning of this tutorial, I asked you to leave page 1 empty. This is the reason. We want to generate table of content automatically based on chapter, sections and subsections that we created using Heading 1, Heading 2 and Heading 3.
For the purpose of this tutorial, I created dummy chapters, sections and subsections, by clicking Heading 1 to 3. You should do that also.
2. Generating Table of Content
Go to References, click Table of Contents, choose custom Table of Content. Refer to Figure 9 if you are not sure how to do it.
3. Customizing Table of Content (TOC)
Choose none in Tab leader and make sure Show levels is 3. Then click OK. Magically it is created for you. For those who have trouble removing the dots in the tab leader, check on the comment where I explained further.
4. Fixing The Format of TOC
Probably, you are not satisfied with the format of TOC. You can modify it easily. For example, move first line indent pointer on the ruler of chapter to the left, then the other chapters will follow.
5. Updating Table of Content
Let say you restructure your thesis, changing section title or modifying page number. You can update the TOC by clicking Update Table on References tab. Then you have option to update the page number only or the whole table.
6. The Limitations of TOC
TOC can only be generated for chapters ONLY. The rest, you have to write manually, such as declaration, abstract, etc. But it is OK, because they are not as complicated as chapters. At least, the biggest trouble has passed.
That is all for this tutorial. I might post another tutorial regarding figure numbering and citing. But it is quite easy. Any questions, just ask.
For the purpose of this tutorial, I created dummy chapters, sections and subsections, by clicking Heading 1 to 3. You should do that also.
2. Generating Table of Content
Go to References, click Table of Contents, choose custom Table of Content. Refer to Figure 9 if you are not sure how to do it.
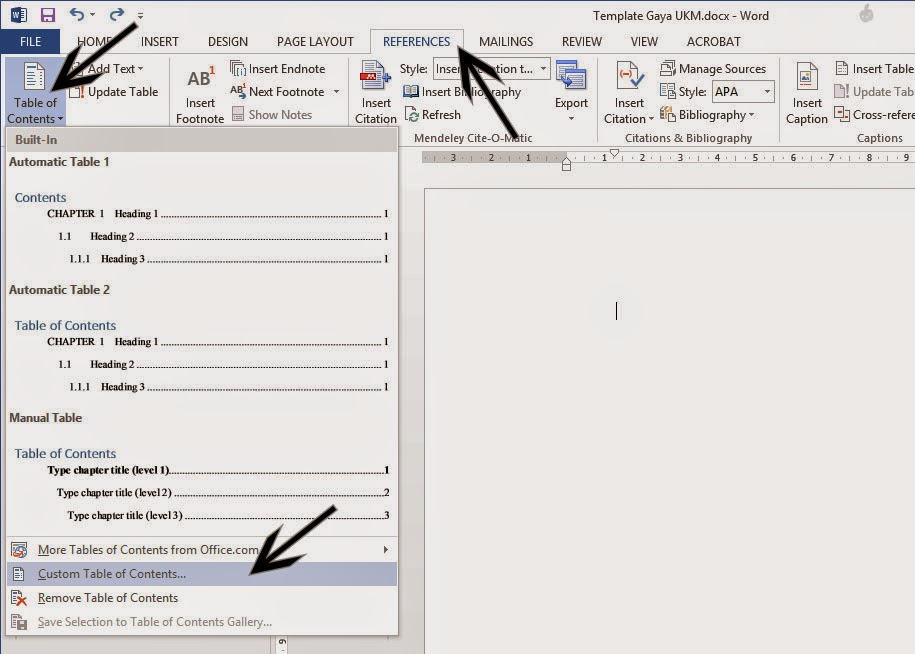 |
| Figure 9. Generate Table of Content |
3. Customizing Table of Content (TOC)
Choose none in Tab leader and make sure Show levels is 3. Then click OK. Magically it is created for you. For those who have trouble removing the dots in the tab leader, check on the comment where I explained further.
 |
| Figure 10. Customizing Table of Content |
4. Fixing The Format of TOC
Probably, you are not satisfied with the format of TOC. You can modify it easily. For example, move first line indent pointer on the ruler of chapter to the left, then the other chapters will follow.
 |
| Figure 11. Fixing Format of TOC |
5. Updating Table of Content
Let say you restructure your thesis, changing section title or modifying page number. You can update the TOC by clicking Update Table on References tab. Then you have option to update the page number only or the whole table.
6. The Limitations of TOC
TOC can only be generated for chapters ONLY. The rest, you have to write manually, such as declaration, abstract, etc. But it is OK, because they are not as complicated as chapters. At least, the biggest trouble has passed.
That is all for this tutorial. I might post another tutorial regarding figure numbering and citing. But it is quite easy. Any questions, just ask.
Work Hard, God will Do the Rest


thank you :)
ReplyDeletehow about the reference/citation?
You mean format of reference header? Same concept as other chapter. Use Heading 1, then enter, then type "REFERENCE" with title style.
Deletehi,
ReplyDeleteDoes this means that all the chapters can be written in one document? since before this I make 1 document for only one chapter ==. if it is, this will make my life way easier.
hai,
ReplyDeletethank you for the helpfull tips. Does this mean that i can write the whole chapters in one document? since before this i have to write one chapter for one document
That is very true. Yes, you can write the whole thesis in 1 file. I am doing it. However, I only use Heading 1 and so on, for Chapters, references and appendix (with little bit of modification). In a thesis, you have to write cover page, acknowledgement, etc. Those pages are written manually. Well, this is my way. I'm welcomed if you have other option.
Deletehi there, thanks for the feedback.
Deletejust wanted to share. I've tried using the your methods in my writing and so far it is way better than my methods. way more organised. i didn't have to open and close too many documents since i only use one doc for the whole chapters. thank you so much. really appreciate it XD.
about TOC, I've already select 'none' for tab leader but after clicking OK, the '.....' tab leader still appear. do you have a solution for this problem?
ReplyDeleteTOC is a bit tricky. Each point of TOC (for example Chapter II, 2.1, 2.1.1) follows different style. Assuming you generate TOC automatically.
Delete- Chapter I, Chapter II, so on, follow style of "TOC 1"
- 2.1, 2.2, so on, follow style of "TOC 2"
- 2.1.1, 2.1.2, so on, follow style of "TOC 3"
So, for example if you want to remove the dots of 2.1, you have to modify style "TOC 2". To modify, you have to open the Styles list. There is a small arrow right bottom of Styles, click it. Then go to "TOC 2", right click, choose modify. Choose Format, then Tabs. Then choose the second tab, select none as the leader.
It is a bit complicated, hopefully you can understand.
I'm still trying to use this template,
ReplyDelete1) For reference, when I use it as usual, in the table, it automatically written as Chapter...so what I did, i retype it manually. Is this wrong?
2) How to put the table name?
3) Why my subtitle not at the center, is it because i use Microsoft 2007?
4) How to add manually for declaration, abstract, etc.? ..because it is not clickable to add another row for sentence
Sorry for bothering you. Thank you.
1. If you mean reference header, yes you use heading 1 style and yes it will be written as Chapter in the navigation pane (document map if you use Word 2007). For TOC, you have to change "Chapter.." to "References" manually. Be careful that you dont disrupt the TOC format.
Delete2. Did you mean table title? Go to References ribbon, Insert caption, choose table as label, go to Numbering, choose 1,2,3 format, tick include chapter number. Then the table number is generated automatically. You can add the title as you like.
3. I am not sure why subtitle is not at the center. You can check the subtitle style. Right click the subtitle style, modify, and make sure the center format is active.
4. Did you mean adding them in TOC? You cant really add in the generated TOC, you have to provide blank space before the TOC. You manually write them, before the TOC.
Hope this helps.
Sorry for my broken english.
DeleteThank you for helping me.
One more question.
I'm referring to panduan penulisan tesis.
This template format is quite different for TOC
How can I edit it? For example..
CHAPTER 1 INTRODUCTION
1.1 Background of Study 2
1.2 Problem Statement 2
Thank you.
You are right, for TOC, you need to modify it (later I will modify this guide so that you all can modify the TOC easier). For now, I'll tell you how to modify it.
Delete1. When you use Heading 1 style. write chapter title also. Although you can't see it (because it is in white color), but it will be shown in the navigation pane and in the TOC.
What I mean is that, don't leave it blank as I told you in the guide, but write the title, for example: "INTRODUCTION".
2. Go to your generated TOC (assuming you have created it), update field, update entire table. Then you will see: CHAPTER 1 INTRODUCTION.
3. In the TOC, change the "1" to "I" as followed in UKM Style (Gaya UKM). Done.
As I mentioned before, TOC is a bit tricky, but it is better than manually writing everything :)
Thank you. Already done it :)
DeleteExcept, same question as faten fufoo, dots for TOC2 and TOC3 cannot be remove. Even though i tried to set it as none.
Only successful for TOC1.
There are few tab stop positions. Make sure you choose the last tab stop (you can click the number in the list dialog). The purpose of the last tab stop is to position the page number.
DeleteThe last tab stop supposedly is 14.5 cm (or around that value) and the last tab stop's alignment is right. Then set the Leader to none.
Alhamdulillah.
DeleteAlready done it. Thank you so much :)
how to make the start page number 1 from the chapter 1 and not from contents?
ReplyDeleteYou have to use Section Break before every chapters. In TOC pages, you use page numbers i, ii, so on. Then use Section Break after you finish writing TOC. On chapter pages, you change the format of page numbers 1,2,3, so on and make sure it starts from 1.
DeleteTry to Google about section break if you still dont understand.
i am so sorry, can you help me for numbering the pages? thank you.
DeleteAssuming your last page before chapter is List of Figure. So, at the end of list of Figure, add section break (Next page).
DeleteThen on the next page, insert page number. Go to the Page number format, start from 1 (instead of continue from previous section). Tick also "Different on first page".
If you still cant understand, Mr Google always ready to help.
Thank you so much. Really appreciate your afford to assist others
ReplyDeleteAssalam Tuan,
ReplyDeleteDo you provide ready made template, for Bahasa melayu version? Thanks
Yes. You can download the BM version (check the first step). Inform me if the template is missing something.
DeleteWell..the template is not perfect as I replied other comments. I still don't have time to fix it. But you can modify accordingly.
Thank you so much. Your assistance is so useful for me. Wish u all the best and success.
ReplyDeleteDear dps and everyone accessing here for gaya ukm,
ReplyDeleteThank you very much for providing template for gaya ukm. My thesis is almost done, now I am copying and pasting it in the template provided here. Following your instruction I left a page blank for generating TOC. When I generated TOC after copying my entire Chapter 1, the page number was ok, but when I have manually inserted the preceding pages (title page, acknowledgement, abstract etc.) , I see English numbers for all these pages. As we know according to gaya we have to use roman number for the first few pages, can I change them into roman numbers? I will highly appreciate any help in this regard.
Hi Somebody,
DeleteCorrection on my first step, use Section Break instead of Page Break. So, before chapter page, insert Section break - next page. Insert page number on the pages before chapters, format it to roman. On chapter page, format the page number to numeric and start from 1, also check 'different on first page'. Hope this helps.
As an alternative, this year UKM has released their official template which is quite accurate. Just that they did not provide guide how to use it.
Thank you very much for taking time to reply. Yes, there is the ukm official template available, regrettably without guidelines.
ReplyDeleteI have found your step by step guidelines very useful. I have finished copying my thesis in your template until chapter 3. I would highly appreciate if you could to tell me how I can insert tables in your template which are compatible to gaya ukm? Though in my previously prepared thesis (five files for five chapters and individual files for references and appendices) I prepared the tables compatible to gaya ukm, when I tried to copy these tables in your template, they become very awkward and I even cannot edit them in my effort to make them compatible to gaya ukm.
However, if you could inform step by step procedures of how one can add tables, references and appendices in your template and modify the template to make it compatible to gaya ukm, many ukm students like me will be benefited and will remain thankful to you.
Finally, I really appreciate your voluntary service for the student community of ukm.
Hi,
DeleteTo answer your question, I need to write a long guide. Currently I am busy. So, what I can do is give you rough idea.
1. Add table. Table is drawn as normal table. However, the issue is the caption of table (or figure). Caption is the table number and its title. Word can automatically generate the table number (if you have properly set the heading). I found the guide of setting caption in: https://support.office.com/en-us/article/Add-format-or-delete-captions-in-Word-82fa82a4-f0f3-438f-a422-34bb5cef9c81?ui=en-US&rs=en-US&ad=US
2. References. I trick my template by treating references or appendices as Chapter. So, create a chapter with title: References. Which means, write "References" as Heading 1 and Title.
3. Appendices. Same as References.
You are welcomed.
Hi dps,
ReplyDeleteI have used your template not the official one as it does not have step by step guidelines like yours. May I request you to inform how to add references and appendices in your template which will be automatically generated in the navigation pane as well as in TOC.
Thanks in advance.
Hi,
DeleteI answered in the previous comment.